By Robby Lockeby
My Great Pyrenees is the perfect herd dog: she’s aggressive enough to chase off predators, yet gentle enough to not hurt the goats. The only problem was that she would let the goats eat most of her dog food. Dog food is simply too expensive to feed to animals designed to eat weeds and brush.
I needed a goat-proof dog feeding area. To come up with an effective design, I needed to think of something that dogs were good at that goats were not so good at.
Dogs can be trained to go through a hole that goats cannot manage. Dogs generally have shorter and more flexible legs than goats. They also have more tubular-shaped torsos, while goats tend to have pot bellies. I realized that a properly-placed hole in a piece of plywood would work perfectly to create a goat-proof feeding area.

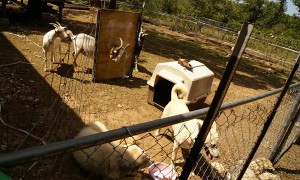
Here’s the finished dog feeding area. As much as they may try, the goats cannot get in.
This plan can be easily modified to take advantage of the materials and tools you have on hand. Here are the materials and tools that I used:
Materials
¾-inch plywood (4 x 3-feet)
5-foot T-post (2 each)
wood screw
4-foot field fencing (20 feet)
12 inches of string
Tools
pencil
tape measure
screw
drill
¼ inch drill bit
screwdriver
jig saw
T-post driver
pliers
wire cutters
Directions
First, measure for the hole in the piece of plywood. Generally speaking, animals can fit through much smaller holes than we tend to think they can. With that in mind, start with a small hole and increase in size if needed. My largest dog is a Great Pyrenees, so I chose a 10-inch hole. I wanted the center of the hole to be roughly the height of the nose of the dog. An inch or two off won’t make much difference, but it is better to be a little high than a little low. For my dogs, I centered the hole at 19 inches from the bottom of the plywood (which will be at ground level).
Step 1: Lay the piece of plywood on some saw horses or a suitable sturdy work surface.
Step 2: Mark the horizontal center of the plywood. I used a 3×4-foot piece of plywood so my center line was 18 inches from either side.
Step 3: Place a mark on the center line 19 inches from the bottom. This will be the center of the hole.
Step 4: Draw a 10-inch hole centered on the mark you have just made. An easy way to do this is to take a piece of string. Make two loops in the string 5 inches apart. Place the wood screw in the center of the mark you made on the plywood. Don’t run the screw all the way in; leave ½ inch of the screw exposed. Place one of the loops of the string around the screw and the other loop around the pencil. Make a test mark and measure to make sure the mark is 5 inches from the center of the screw. Readjust as needed, but keep in mind that pinpoint accuracy is not necessary. Keeping the string taut, draw the circle.
Step 5: Drill a ¼-inch hole inside the circle and then place the blade of the jigsaw inside the drilled hole and cut out the circle.
Step 6: Lay out the dog feeding area. This is the area that you want to be inaccessible to goats. I made the area big enough for a dog house, a couple of dog dishes, and room for the dogs to lie down. I also chose to use a section of the existing fence as one side of my dog feeding area.
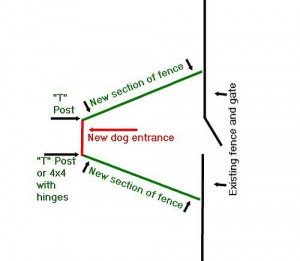
Step 7: Decide where to place the entrance for the dogs. This is the piece of plywood that you cut the hole in. Drive the two T-posts in place about 34 inches apart. These will hold the dog entrance in place. Note: You will need to access this feeding area. If there is not an existing gate already, you could substitute a 4×4 for one of the T-posts and hinge the dog entrance off of it.
Step 8: Stretch your field fencing from your existing fence to the T-posts, leaving the space between the T-post open. Attach the fencing on both ends.
Step 9: Mount the dog entrance on both T-posts or on the 4×4 if you choose to hinge the dog entrance.
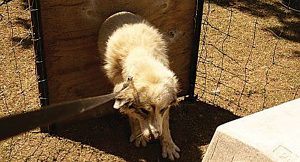
Step 10: Train the dogs to use it. I quickly trained my dogs by holding one of their dog biscuits from inside the feeding area and coaxing them in. They were both a little wary at first. I gently tugged their collars once their heads were through and then they came through on their own. Do not force them. Being patient and gentle at this point will make the training very quick and easy. I did this in both directions (in and out) three times. After that, my dogs were both more than willing to come and go on their own.

Training the dog to go through the hole
My 110-pound Great Pyrenees fit through a the 10-inch hole, although I did go back later and enlarge the hole to 11 inches to make it a little easier for her. My other dog, a shepherd, barely slowed down while going through the 10-inch opening.
The dogs now have a place to eat, away from the goats. The goats can stick their heads through, but cannot climb in. A goat with horns may get their head stuck in the dog entrance, as is the case with the goat in the picture. She got stuck three times and I released her three times and she hasn’t done it again. Three times seems to be the magic number in training dogs and goats. The other goats have not attempted to enter. This feeder will work very well at keeping out full-sized adult goats. It will not work with juvenile goats. In fact, young goats can get into this feeding area so easily that it may be used as a place to feed young goats away from the adults.
I started with a 3×4-foot piece of plywood because that is what I had. You can modify this plan for use with whatever materials you might have lying around. The basic idea is to make a hole in your fence at the proper height and size to allow a dog through, but not a goat. I did not try a square opening, but I suspect it would work just as well.
This project only took me two hours from conception to completion, including the time spent training the dogs to use it.


I built the thing exactly as stated and the goats beat the dogs into the feeding area. I would truly like to see a structure that would keep the goats out.
Thank you, from Karl in southern ill